Adding a networked printer to your PC is usually a cinch, but what if Windows just won't play nice with it or can't find it at all? Here are a few quick solutions.
Whether you have upgraded to Windows 11 or still use Windows 10, connecting a wireless printer should be easy. Windows should be able to connect automatically to any printer that's on the same network as your PC. But sometimes, Windows doesn't see your printer, and finding a solution can tricky.
If you can't seem to print, first make sure that your printer is actually connected to Wi-Fi. If restarting your printer, checking your cables, and rebooting your computer don't work, here are a few more quick solutions that will ensure Windows plays nice.
1. Find a Connected Printer

A printer can be connected to the internet over an Ethernet or Wi-Fi connection, or to a network computer via direct USB link. A printer connected in one of these ways can be shared with other users on the network by enabling print sharing on the server or on the computer to which the USB printer is connected.
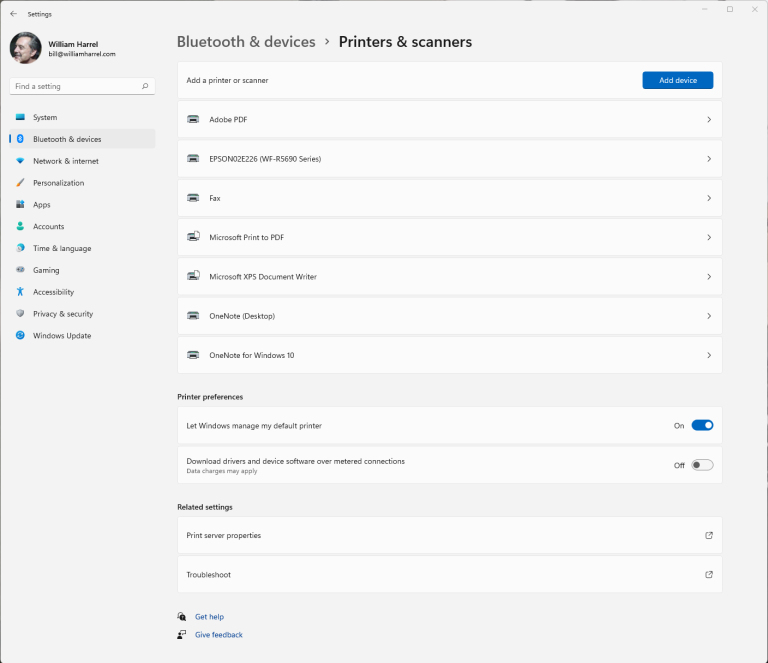
If you believe your printer is connected, it should be listed under Settings > Devices > Printers & scanners in Windows 10. For those running Windows 11, your printer is listed under Settings > Bluetooth & devices > Printers & scanners.
Unlike older versions of the operating system, Windows 10 and 11 usually do not require you to run a wizard to connect your printer. When you connect your printer to your computer, in most cases it should simply show up automatically in the list of installed devices.
2. Share a Network Printer

(Credit: Microsoft / Lance Whitney)
If the printer you wish to use is connected to a different computer on your local network, you must first make sure printer sharing is enabled. Open the Printer & scanners screen using the instructions above, then select the printer and click Manage. Go to Printer Properties, open the the Sharing tab, and enable Share this printer. (In Windows 11, you may first need to select Change Sharing Options before you can check the Share this printer box.)

(Credit: Microsoft / Lance Whitney)
Click Apply, and the printer is now available on your network. To connect from a different computer, return to the Printers & scanners menu and click Add a printer or scanner (Windows 10) or Add Device (Windows 11), and the printer should appear. Click Add device to link the printer with your computer.
3. Add an Unseen Printer

(Credit: Microsoft / William Harrel)
Just because you don't see a printer doesn't mean it isn't there. In an office, for example, some IT departments hide the names of all printers by default. Although IT likely has good reasons for doing so, hidden printers can be a hassle. And other issues could prevent you from seeing an accessible printer.
After conducting a search for a printer, click the printer that I want isn't listed to open a dialog box that will allow you to locate a printer by other means. You have five options here:
My printer is a little older. Help me find it: When you choose this option, Windows performs another search. If it finds your printer, it will display a second dialog box. Select your printer, and Windows will install the drivers. If your printer is not listed, try one of the other options in this dialog box (which may require another search from the Control Panel).
Select a shared printer by name: To use this option, you must know the name of the computer that the printer is connected to and the network name of the printer itself. If you're doing this in an office for a network-attached printer, and you don't know the printer name, ask another employee who uses it, or get it from your IT department.

Add a printer using a IP address or hostname: Choosing this option brings up the "Type a printer hostname or IP address" dialog box. Here, you will need the hostname or IP address for your printer. You can typically get the printer’s IP address from its control panel by printing a status report, or by checking on the printer's built-in onboard web portal.
Windows will query the printer, then display a list of compatible devices, allowing you to select your printer by manufacturer and type. After making your selections, click Next, and it should connect your PC to the printer.
Add a Bluetooth, wireless, or network-discoverable printer: With this option, you can add peer-to-peer network devices that are not actually on your LAN. (Windows does a brute search for all available protocols available to your PC.)
Add a local printer or network with manual settings: Choosing this option runs a wizard that walks you through a series of steps for manually creating a printer port and installing the printer, which requires technical expertise beyond the scope of this entry-level guide.
Run the Troubleshooter

(Credit: Microsoft / William Harrel)
At any point in this process, you can run the Windows troubleshooter to try connecting to the printer. To run the troubleshooter, the printer you’re having trouble connecting to or printing from must be displayed in the available devices list in the Printers & scanners menu. To run it, click the printer in the list, then click Manage.
RECOMMENDED BY OUR EDITORS
In Windows 11, this brings up a control panel for that specific printer. Click Run the troubleshooter from the list of options to make Windows search for problems. Windows 10 users will instead see a new dialog box in which you click Run the troubleshooter in the menu.

